|
Size: 6123
Comment:
|
Size: 5885
Comment:
|
| Deletions are marked like this. | Additions are marked like this. |
| Line 6: | Line 6: |
| Email: <<MailTo(artdanion AT SPAMFREE devlol DOT org)>> <<BR>>Homepage: http://www.daniel-fischer.at | |
| Line 7: | Line 8: |
| Email: <<MailTo(artdanion AT SPAMFREE devlol DOT org)>> <<BR>>Homepage: http://www.daniel-fischer.at |
|
| Line 10: | Line 9: |
| == Projects == ==== SHA2017 Badge Clone ==== a few months ago @doebi and i thought it would be nice to get into ESP32 and the SHA2017 badge hardware. Doebi tried the emulator and created his first app: the weather-app. Soon after this we realized, that the emulator did not support more advanced and more hardware based functions. So i decided to build a badge clone for prototyping and testing. |
|
| Line 11: | Line 13: |
| == Projects == ==== SHA2017 Badge Clone ==== a few months ago @doebi and i thought it would be nice to get into ESP32 and the SHA2017 badge hardware. Doebi tried the emulator and created his first app: the weather-app. Soon after this we realized, that the emulator did not support more advanced and more hardware based functions. So i decided to build a badge clone for prototyping and testing. [[https://pbs.twimg.com/media/DHGJH2KWAAA0r2i.jpg:large|{{https://pbs.twimg.com/media/DHGJH2KWAAA0r2i.jpg:small | SHA2017 Badge Clone}}]] |
[[https://pbs.twimg.com/media/DHGJH2KWAAA0r2i.jpg:large|{{https://pbs.twimg.com/media/DHGJH2KWAAA0r2i.jpg:small|SHA2017 Badge Clone}}]] |
| Line 24: | Line 17: |
| [[https://www.amazon.de/gp/product/B07256ZQ5N | ESP32 WROOM board - Amazon | target="_blank"]] <<BR>> [[https://www.amazon.de/gp/product/B071LGVVL1 | waveshare e-paper 2.9" - Amazon | target="_blank"]] <<BR>> [[https://www.amazon.de/gp/product/B01LBZNGMG | MPR121 board - Amazon | target="_blank"]] <<BR>> |
[[https://www.amazon.de/gp/product/B07256ZQ5N|ESP32 WROOM board - Amazon]] <<BR>> [[https://www.amazon.de/gp/product/B071LGVVL1|waveshare e-paper 2.9" - Amazon]] <<BR>> [[https://www.amazon.de/gp/product/B01LBZNGMG|MPR121 board - Amazon]] <<BR>> |
| Line 31: | Line 19: |
| {{http://www.daniel-fischer.at/projecte/plan_clonee.png | Schematic Drawing}} <<BR>> |
{{http://www.daniel-fischer.at/projecte/plan_clonee.png|Schematic Drawing}} <<BR>> |
| Line 34: | Line 21: |
| [[http://www.daniel-fischer.at/projecte/plan_clonee.pdf | Schematic Drawing Large | target="_blank"]] | [[http://www.daniel-fischer.at/projecte/plan_clonee.pdf|Schematic Drawing Large]] |
| Line 36: | Line 23: |
The I2C lines for the MPR121 need 4.7K pullup resistors and VUSB sensing needs a voltage devider. For the buttons I used some copper foil as electrodes. <<BR>> Later i added some WS2812 LED´s (Datapin on IO32) If you use WS2812 LED´s you have to change this in menuconfig befor build... |
The I2C lines for the MPR121 need 4.7K pullup resistors and VUSB sensing needs a voltage devider. For the buttons I used some copper foil as electrodes. <<BR>> Later i added some WS2812 LED´s (Datapin on IO32) If you use WS2812 LED´s you have to change this in menuconfig befor build... |
| Line 43: | Line 27: |
| [[https://github.com/SHA2017-badge/Firmware | SHA2017 badge Firmware | target="_blank"]] | [[https://github.com/SHA2017-badge/Firmware|SHA2017 badge Firmware]] |
| Line 47: | Line 31: |
| Component config --> SHA2017 Badge --> SHA Badge e-ink default display type --> GDEH029A1 <<BR>> Component config --> SHA2017 Badge --> Enable MPR121 debug messages <<BR>> Component config --> SHA2017 Badge --> DISABLE MPR121 hardcoded baseline values |
Component config --> SHA2017 Badge --> SHA Badge e-ink default display type --> GDEH029A1 <<BR>> Component config --> SHA2017 Badge --> Enable MPR121 debug messages <<BR>> Component config --> SHA2017 Badge --> DISABLE MPR121 hardcoded baseline values |
| Line 53: | Line 33: |
| after autoflash, the MPR121 is to calibrate. <<BR>> Befor the first OTA i had to set a flag on the badge via serial in the monitor by: <<BR>> ( thanks to tsd from the badge team ... to flash every new firmware was boring ) |
after autoflash, the MPR121 is to calibrate. <<BR>> Befor the first OTA i had to set a flag on the badge via serial in the monitor by: <<BR>> ( thanks to tsd from the badge team ... to flash every new firmware was boring ) |
| Line 63: | Line 39: |
The clone works fine with my powerbank, but maybe i will add a LIPO charger board to it. ([[https://www.amazon.de/Lademodul-Schutz-Arduino-charger-Raspberry/dp/B01M3XUA96/ | LIPO charger board | target="_blank"]]) |
The clone works fine with my powerbank, but maybe i will add a LIPO charger board to it. ([[https://www.amazon.de/Lademodul-Schutz-Arduino-charger-Raspberry/dp/B01M3XUA96/|LIPO charger board]]) |
| Line 69: | Line 43: |
| [[https://pbs.twimg.com/media/DGi7493XkAAd8bm.jpg:large|{{https://pbs.twimg.com/media/DGi7493XkAAd8bm.jpg:small|Winkekatze on the clonee}}]] | |
| Line 70: | Line 45: |
| [[https://pbs.twimg.com/media/DGi7493XkAAd8bm.jpg:large|{{https://pbs.twimg.com/media/DGi7493XkAAd8bm.jpg:small | Winkekatze on the clonee}}]] <<BR>> WorldWideWinkeKatzen Project by Aurel: ([[https://github.com/aurelw/winkekatze | Winkekatze github| target="_blank"]]) |
<<BR>> WorldWideWinkeKatzen Project by Aurel: ([[https://github.com/aurelw/winkekatze|Winkekatze github]]) |
| Line 77: | Line 48: |
| {{http://www.time.ufg.ac.at/intime/projekt086/files/2013/02/Aufbau2.png|Watermap|width="400px"}} <<BR>>a physical visualization of weatherdata | |
| Line 78: | Line 50: |
| {{http://www.time.ufg.ac.at/intime/projekt086/files/2013/02/Aufbau2.png | Watermap | width=400px}} <<BR>>a physical visualization of weatherdata |
Water is live. Without water nothing organic exists. |
| Line 81: | Line 52: |
| Water is live. Without water nothing organic exists. |
This water installation visualizes - in a symbolic way - how rain brings the whole world to life. A valve is mounted on rails. Through it, drops of water fall on a surface, that is covered with white fabric. This fabric is coated with hydroscopic colour - as soon as a certain spot gets wet, the white colour becomes transparent, and the image underneath is becoming visible. It is not immediately possible to tell, what the image is. The installation invites to stay longer and watch the world map showing through more and more. To emphasize the association of life, nature and growth, the whole land on the world map is green. |
| Line 84: | Line 54: |
| This water installation visualizes - in a symbolic way - how rain brings the whole world to life. A valve is mounted on rails. Through it, drops of water fall on a surface, that is covered with white fabric. This fabric is coated with hydroscopic colour - as soon as a certain spot gets wet, the white colour becomes transparent, and the image underneath is becoming visible. It is not immediately possible to tell, what the image is. The installation invites to stay longer and watch the world map showing through more and more. To emphasize the association of life, nature and growth, the whole land on the world map is green. The „rain“ is consisting of single drops, which only fall if it really rains on a certain position on earth, according to a synchronized weather app. The whole world map will never show - on the one side because it never rains at the same time everywhere, on the other side because the synchronization with the weather app is not permanent but happens in intervals. Also strong rain in one region is being translated into minimal dropping. |
The „rain“ is consisting of single drops, which only fall if it really rains on a certain position on earth, according to a synchronized weather app. The whole world map will never show - on the one side because it never rains at the same time everywhere, on the other side because the synchronization with the weather app is not permanent but happens in intervals. Also strong rain in one region is being translated into minimal dropping. |
| Line 92: | Line 58: |
| more info + video: [[http://www.time.ufg.ac.at/intime/projekt086/ | Watermap blog | target="_blank"]] |
more info + video: [[http://www.time.ufg.ac.at/intime/projekt086/|Watermap blog]] |
| Line 96: | Line 61: |
| {{https://scontent-vie1-1.xx.fbcdn.net/v/t31.0-8/16664993_1408251325864875_4398727564434777335_o.jpg?oh=ed21f6c7b213f8d1326990c306b7abb1&oe=5A210E91|OSC Gyro-Device|width="400px"}} | |
| Line 97: | Line 63: |
| {{https://scontent-vie1-1.xx.fbcdn.net/v/t31.0-8/16664993_1408251325864875_4398727564434777335_o.jpg?oh=ed21f6c7b213f8d1326990c306b7abb1&oe=5A210E91 | OSC Gyro-Device | width=400px}} | {{https://scontent-vie1-1.xx.fbcdn.net/v/t31.0-8/16601600_1408251225864885_205949366408876410_o.jpg?oh=19c446cafaaad4116c21b97d56292700&oe=5A2DF100|PCB OSC Gyro-Device|width="400px"}} |
| Line 99: | Line 65: |
| {{https://scontent-vie1-1.xx.fbcdn.net/v/t31.0-8/16601600_1408251225864885_205949366408876410_o.jpg?oh=19c446cafaaad4116c21b97d56292700&oe=5A2DF100 | PCB OSC Gyro-Device | width=400px}} | [[attachment:osc_deepspace.png]] |
| Line 101: | Line 67: |
| Video at ArsElectronica DeepSpace (8K Projection + Lasertracking + OSC Demo) : [[https://vimeo.com/188064000 | Video DeepSpace | target="_blank"]] | Video at ArsElectronica DeepSpace (8K Projection + Lasertracking + OSC Demo) : [[https://vimeo.com/188064000|Video DeepSpace]] |
| Line 104: | Line 70: |
| {{http://www.daniel-fischer.at/bilder/Effect_Pad1.png|Effect Pad}} <<BR>>more pictures and a few videos here: (http://www.daniel-fischer.at/EffectPad.html) | |
| Line 105: | Line 72: |
| {{http://www.daniel-fischer.at/bilder/Effect_Pad1.png | Effect Pad}} <<BR>>more pictures and a few videos here: (http://www.daniel-fischer.at/EffectPad.html) |
a touch and proximity sensing MIDI Controller<<BR>> based on the Teensy 3.1 microcontroller and the MPR121/CAP1188 sensing Chips |
| Line 108: | Line 74: |
| a touch and proximity sensing MIDI Controller<<BR>> based on the Teensy 3.1 microcontroller and the MPR121/CAP1188 sensing Chips the antennas are laser engraved to the back of the [[http://www.plexiglas-shop.com/DE/de/plexiglas-led/fuer-hinterleuchtung-fgs06f3a5ma.html | Plexiglas LED | target="_blank"]] and filled up with conductive paint. WS2812 RGB LED´s are used to light up the fields. |
the antennas are laser engraved to the back of the [[http://www.plexiglas-shop.com/DE/de/plexiglas-led/fuer-hinterleuchtung-fgs06f3a5ma.html|Plexiglas LED]] and filled up with conductive paint. WS2812 RGB LED´s are used to light up the fields. |
| Line 115: | Line 77: |
| {{http://www.daniel-fischer.at/projecte/TicTac/TicTac_kl.png | TicTacToe}} <<BR>>multiplexing LED´s and buttons with an AT328 microcontroller |
{{http://www.daniel-fischer.at/projecte/TicTac/TicTac_kl.png|TicTacToe}} <<BR>>multiplexing LED´s and buttons with an AT328 microcontroller |
| Line 120: | Line 80: |
| {{http://www.daniel-fischer.at/projecte/Motor_Shild/Motor_Shild01_DC_kl.png | MotorShild}} <<BR>>MotorShield on an ATMega 2650 Arduino Board |
{{http://www.daniel-fischer.at/projecte/Motor_Shild/Motor_Shild01_DC_kl.png|MotorShild}} <<BR>>MotorShield on an ATMega 2650 Arduino Board |
artdanion
Email: <artdanion AT SPAMFREE devlol DOT org>
Homepage: http://www.daniel-fischer.at
Projects
SHA2017 Badge Clone
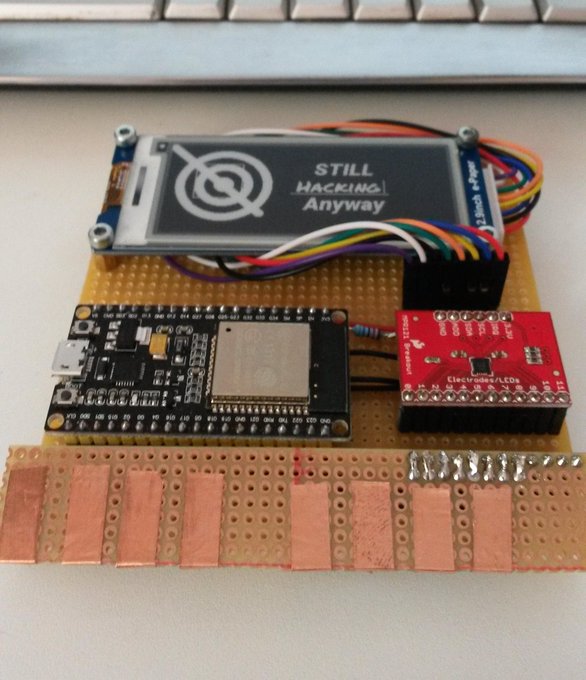
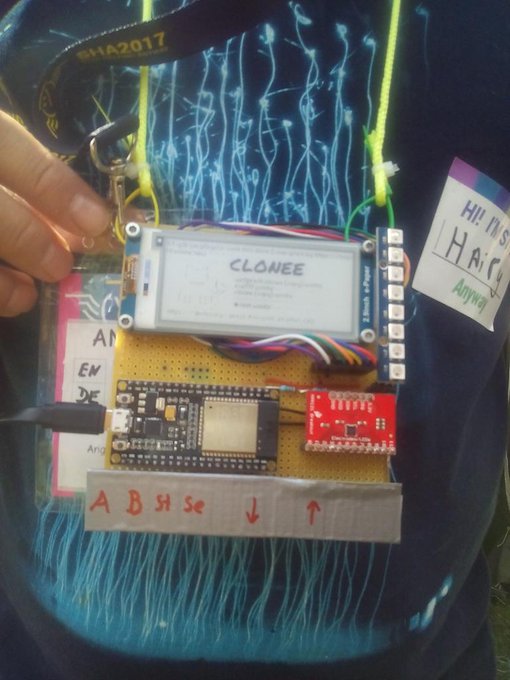
a few months ago @doebi and i thought it would be nice to get into ESP32 and the SHA2017 badge hardware. Doebi tried the emulator and created his first app: the weather-app. Soon after this we realized, that the emulator did not support more advanced and more hardware based functions. So i decided to build a badge clone for prototyping and testing.
main components:
ESP32 WROOM board - Amazon
waveshare e-paper 2.9" - Amazon
MPR121 board - Amazon
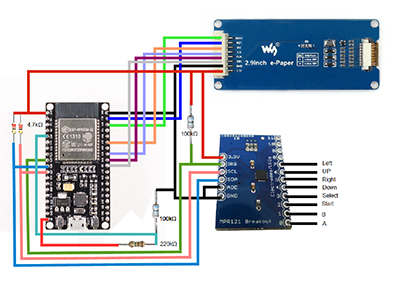
The I2C lines for the MPR121 need 4.7K pullup resistors and VUSB sensing needs a voltage devider. For the buttons I used some copper foil as electrodes.
Later i added some WS2812 LED´s (Datapin on IO32) If you use WS2812 LED´s you have to change this in menuconfig befor build...
the original firmware works with this parts:
in menuconfig are this things to change:
Component config --> SHA2017 Badge --> SHA Badge e-ink default display type --> GDEH029A1
Component config --> SHA2017 Badge --> Enable MPR121 debug messages
Component config --> SHA2017 Badge --> DISABLE MPR121 hardcoded baseline values
after autoflash, the MPR121 is to calibrate.
Befor the first OTA i had to set a flag on the badge via serial in the monitor by:
( thanks to tsd from the badge team ... to flash every new firmware was boring )
The clone works fine with my powerbank, but maybe i will add a LIPO charger board to it. (LIPO charger board)
DON´T forget to wink ![]() (Apps-->Graphics-->Winkekatze)
(Apps-->Graphics-->Winkekatze)
WorldWideWinkeKatzen Project by Aurel: (Winkekatze github)
Watermap

a physical visualization of weatherdata
Water is live. Without water nothing organic exists.
This water installation visualizes - in a symbolic way - how rain brings the whole world to life. A valve is mounted on rails. Through it, drops of water fall on a surface, that is covered with white fabric. This fabric is coated with hydroscopic colour - as soon as a certain spot gets wet, the white colour becomes transparent, and the image underneath is becoming visible. It is not immediately possible to tell, what the image is. The installation invites to stay longer and watch the world map showing through more and more. To emphasize the association of life, nature and growth, the whole land on the world map is green.
The „rain“ is consisting of single drops, which only fall if it really rains on a certain position on earth, according to a synchronized weather app. The whole world map will never show - on the one side because it never rains at the same time everywhere, on the other side because the synchronization with the weather app is not permanent but happens in intervals. Also strong rain in one region is being translated into minimal dropping.
This minimalistic approach stresses the importance and the incalculable value of the creation of life and how fragile our ecosystem really is.
more info + video: Watermap blog
OSC Gyro-Device


Video at ArsElectronica DeepSpace (8K Projection + Lasertracking + OSC Demo) : Video DeepSpace
Effect Pad

more pictures and a few videos here: (http://www.daniel-fischer.at/EffectPad.html)
a touch and proximity sensing MIDI Controller
based on the Teensy 3.1 microcontroller and the MPR121/CAP1188 sensing Chips
the antennas are laser engraved to the back of the Plexiglas LED and filled up with conductive paint. WS2812 RGB LED´s are used to light up the fields.
TicTac
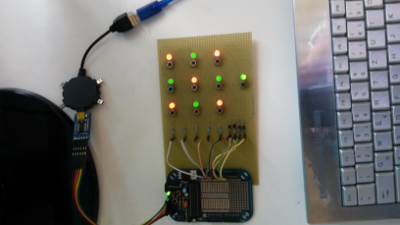
multiplexing LED´s and buttons with an AT328 microcontroller
MotorShield-L298
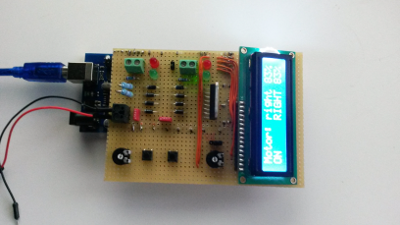
MotorShield on an ATMega 2650 Arduino Board

